Introduction
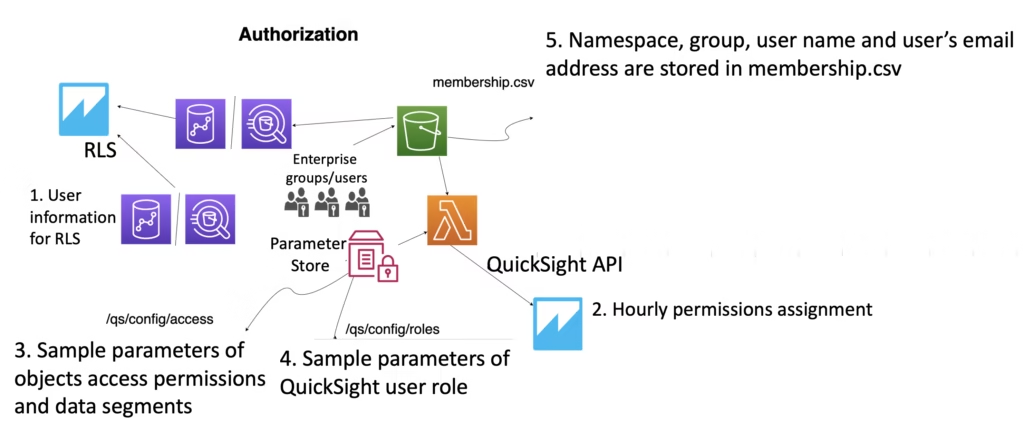
Amazon QuickSight Row Level Security (RLS) ensures that users can only view the data they are authorized to access. This guide walks you through the step-by-step process of implementing RLS in QuickSight dashboards, allowing administrators to control data visibility effectively.

Prerequisites
Before implementing RLS, ensure the following requirements are met:
- An Amazon QuickSight Enterprise Edition account
- Administrator access to QuickSight
- A configured data source in QuickSight
- A main dataset requiring row-level security
Step 1: Prepare the Permissions Dataset
Create a CSV file with the following structure:
UserName, AccountId
user_1,42966743-f0a8-4ac1-93c4-4411c332ec87ef
user_2,2dc0f3ee-bcbb-4412-a8bd-33333333
Important Notes:
- Column names are case-sensitive (e.g., “UserName”).
- UserNames must match QuickSight usernames precisely.
- Include QuickSight administrators who need access.
- Multiple rows per user are allowed if users need access to multiple accounts.
Step 2: Create the Permissions Dataset in QuickSight
- Go to the QuickSight homepage.
- Click Datasets in the left panel.
- Click New dataset.
- Choose Upload a file.
- Upload your CSV file.
- Click Next.
- Verify data types:
- UserName: String
- AccountId: String
- Click Create dataset.
Step 3: Configure Row-Level Security on the Main Dataset
- Navigate to Datasets.
- Locate your main dataset.
- Click the three dots (…) next to the dataset.
- Select Security.
- Click Row-level security.
- Enable Use a dataset.
- Select your permissions dataset from the dropdown.
Step 4: Map RLS Columns
- In the RLS configuration:
- User column: Select “UserName”
- Data value column: Select “AccountId”
- Dataset column to match: Choose the matching column in your main dataset
- Click Apply.
Step 5: Refresh Datasets
To ensure the updated RLS settings are applied:
- For the Permissions Dataset:
- Click three dots (…).
- Select Refresh now.
- For the Main Dataset:
- Click three dots (…).
- Select Refresh now.
Step 6: Configure Analysis Filters
- Open your analysis in QuickSight.
- Go to the Filter pane.
- Configure the AccountId filter:
- Enable Only values in filter dataset.
- Enable Cascade to other filters.
- Enable Show only values that users have permission to see.
Step 7: Test Access
- Share the dashboard with test users.
- Verify each user sees only their authorized data:
- user_1 should see only their AccountId.
- user_2 should see only their AccountId.
- Test filters:
- Users should only see their authorized AccountIds in filter dropdowns.
Advanced Configuration Options
Implementing Multiple Column Security
- Add additional columns in the permissions dataset.
- Configure mapping for each column in the RLS settings.
- Ensure all conditions match for accurate data access.
Dynamic Rules with Database Tables
For larger organizations, dynamically manage RLS permissions:
- Store permissions in a database table.
- Configure QuickSight to query the table directly.
- Set up automatic refresh schedules.
Troubleshooting
Users Cannot See Data
- Ensure UserName in permissions dataset matches QuickSight username.
- Refresh datasets manually if needed.
- Clear browser cache.
- Verify dashboard sharing settings.
Filters Show All Values
- Confirm filter settings restrict access correctly.
- Check RLS mapping configuration.
- Refresh datasets.
- Ensure filter is using the RLS-applied column.
Performance Issues
- Use SPICE storage instead of Direct Query for faster performance.
- Optimize permissions dataset size.
- Reduce data refresh frequency if unnecessary.
Best Practices for RLS in QuickSight
- Regularly update the permissions dataset.
- Use SPICE for optimized performance.
- Validate access controls frequently.
- Maintain a backup of permissions dataset.
- Consider automating permissions updates using AWS Lambda.
- Monitor for unauthorized access attempts.
Maintenance Considerations
- Conduct regular RLS audits.
- Update permissions when:
- New users are added.
- User roles change.
- Employees leave the organization.
- Document RLS configurations for future administrators.
Conclusion
Implementing Row Level Security in Amazon QuickSight enhances data security by ensuring users access only authorized information. By following this step-by-step guide, you can configure and manage RLS efficiently, ensuring data governance and compliance in your dashboards.


